How to integrate GameAnalytics into your Lovable project

min read
A short guide for game developers who want to add GameAnalytics to a Lovable project. Learn how to connect the GameAnalytics documentation MCP server, prompt Lovable to integrate analytics, and start collecting events with your game key and secret key.
GameAnalytics makes it easy to add analytics to your Lovable project, especially if you give it direct access to the right documentation.
If you are building a game or game-like product in Lovable and want analytics without manually wiring everything yourself, the simplest path is to connect the GameAnalytics Documentation MCP server as a custom chat connector, then ask Lovable to integrate GameAnalytics into your project. Lovable supports custom MCP servers as chat connectors, which lets the agent read external documentation and use that context while building.
On the GameAnalytics side, the platform is designed around SDK-based event tracking, and our docs recommend using a prebuilt SDK when one is available.
Why this works so well in Lovable
Lovable’s chat connectors are built for exactly this kind of workflow: bringing external context into the build process. Lovable says chat connectors can let the agent read structured data like docs, and custom MCP servers are supported on paid plans.
That means instead of pasting SDK instructions into a prompt, you can connect the GameAnalytics docs once and let Lovable retrieve the implementation guidance directly when you ask it to add analytics. In this video, you can see how quick and easy the integration is:
What you need before you start
You only need two things:
- a Lovable project
- a GameAnalytics account
Before you start, create a Game in the GameAnalytics tool representing your app: give it a name, choose the relevant platform, SDK and store type (likely Platform (Browser/HTML5) -> SDK (JavaScript) -> Store (Other)), and store the game key and secret key from the settings. GameAnalytics’ SDK setup is built around those credentials.
Step 1: Add the GameAnalytics documentation connector in Lovable
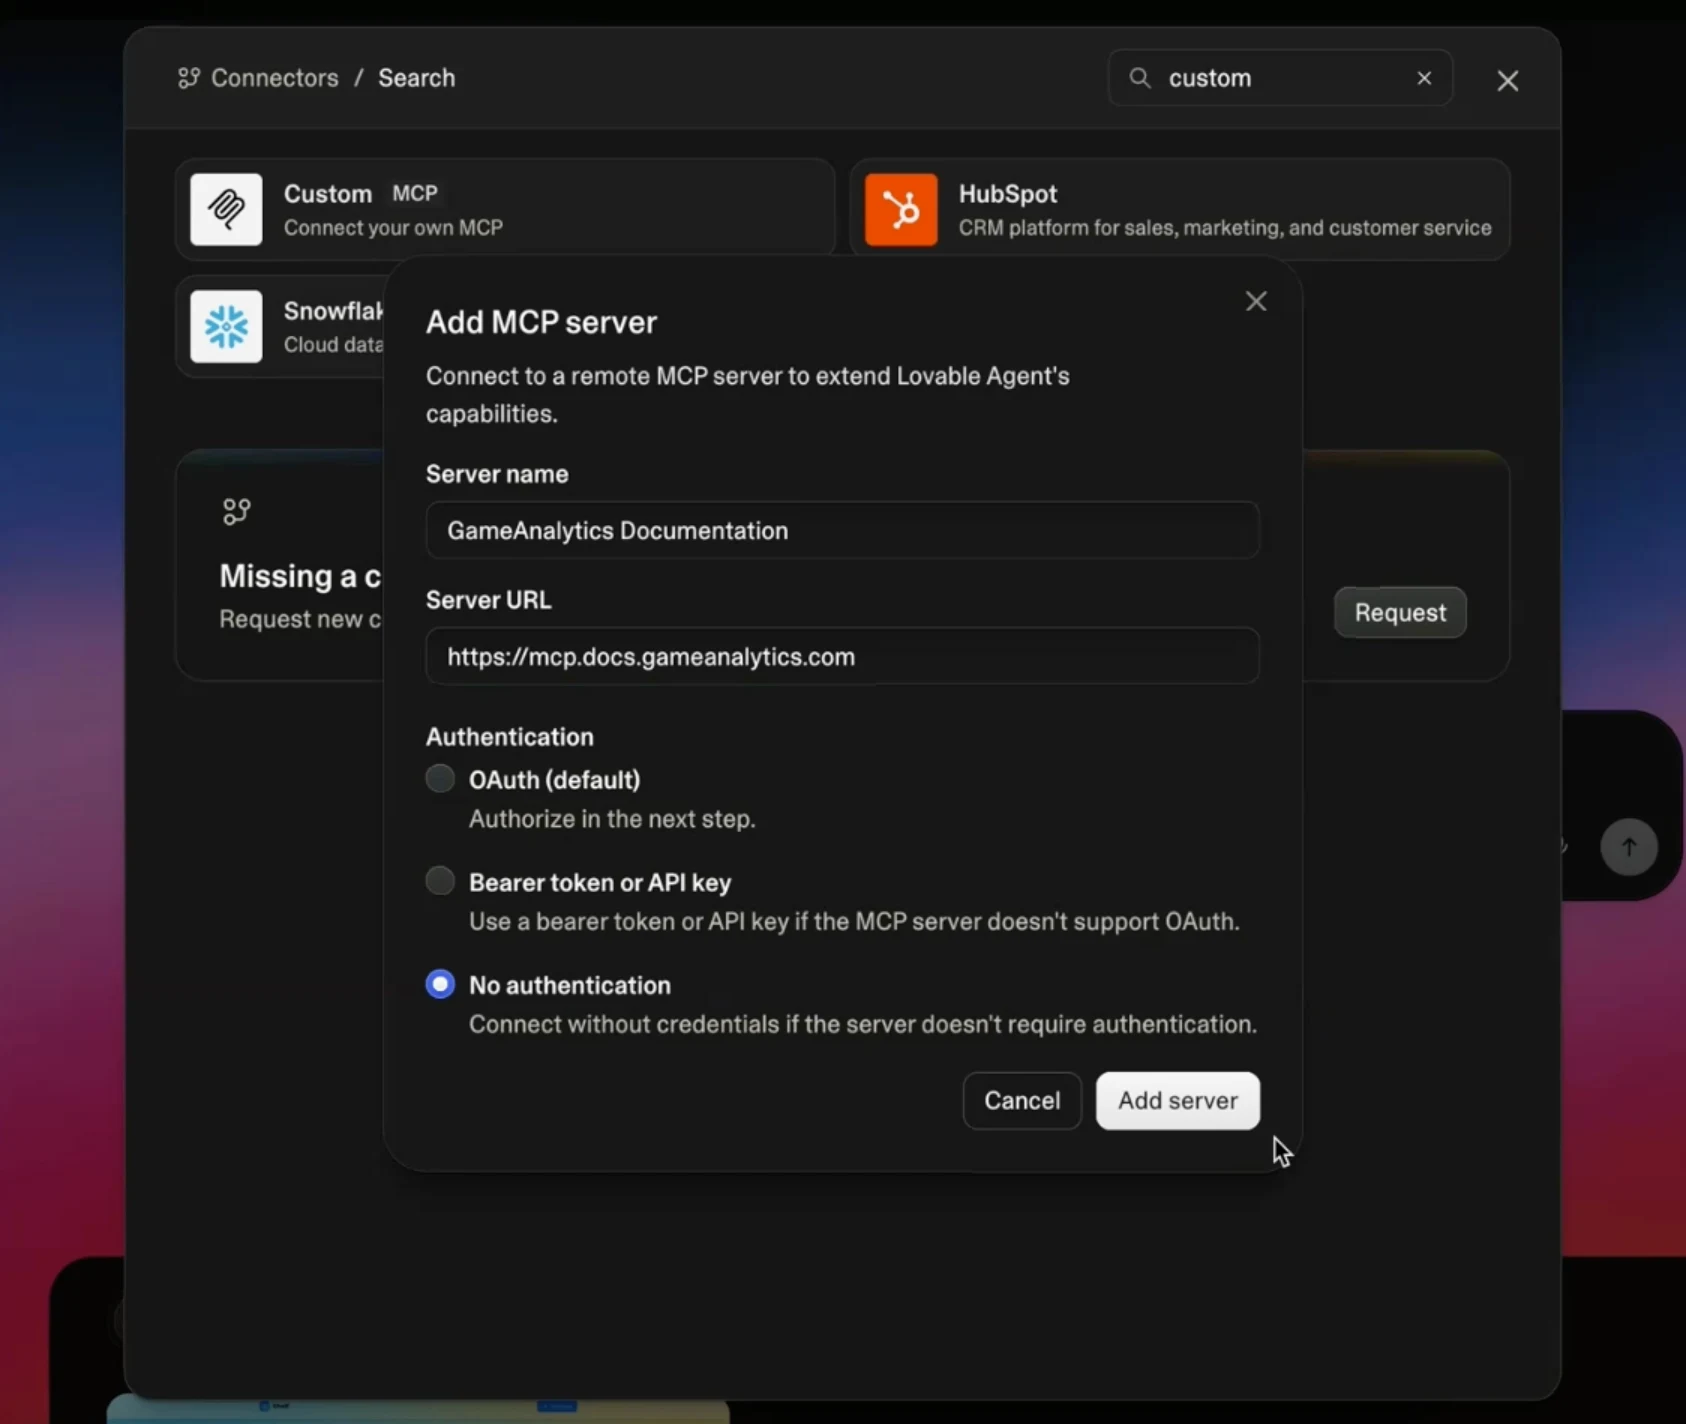
In Lovable, open Connectors and create a custom chat connector (you need to search for it as it does not appear instinctively).
Use these settings:
- Name: GameAnalytics Documentation
- Server URL: https://mcp.docs.gameanalytics.com
- Authorization: none
That is all you need for the connector itself. Lovable documents this flow for custom MCP servers: you add a custom server URL, connect it as a chat connector, and then the agent can use it as context while building.
Step 2: Go into your project and ask Lovable to integrate GameAnalytics
Once the connector is in place, go back into your Lovable project and prompt it plainly: “Integrate GameAnalytics.”

This is where the setup becomes very straightforward. Because Lovable can access the GameAnalytics documentation through the connector, it can look up the relevant SDK path, understand how initialization should work, and generate the required code in your project.
GameAnalytics publishes SDK documentation across engines and runtimes including JavaScript, Unity, Unreal, Roblox, C++, and C#, and positions those SDKs as the preferred way to instrument analytics.
For a Lovable-built web app or lightweight interactive project, the most suitable fit is the JavaScript SDK. That is not something you have to hardcode in the prompt yourself if Lovable can retrieve the docs and choose the appropriate implementation path. GameAnalytics has a dedicated JavaScript SDK guide for browser-based integrations.
Step 3: Enter your GameAnalytics game key and secret key
When Lovable asks for credentials, paste in the game key and secret key from your GameAnalytics game. Lovable will add some default tracked events, but you can always ask it to be more specific and implement the exact events you're interested in.
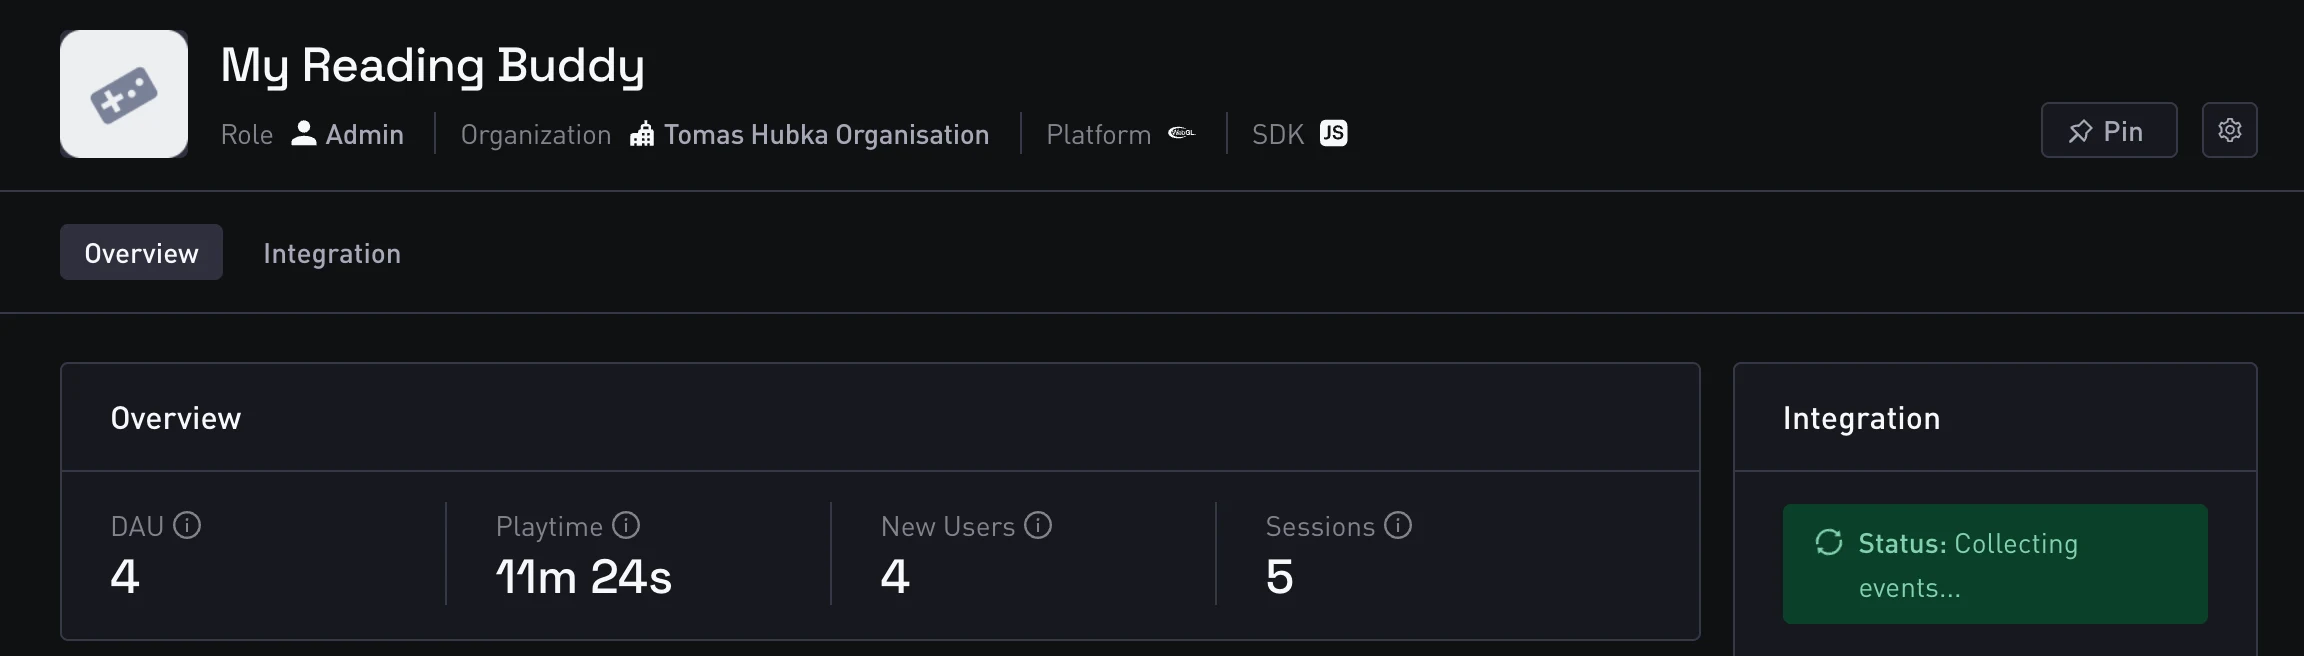
That is the moment when the integration becomes live. Once the SDK is initialized correctly and the first events are sent, GameAnalytics starts collecting data for that project. All GameAnalytics insights are powered by event-based tracking via the SDK.
Step 4: Give the first events a little time
After setup, you may not see every field populate instantly. It can take a short amount of time for the first events to come through and for dashboards and other views to begin filling in.
That said, once the integration is correct, you should start seeing activity appear across GameAnalytics surfaces such as the homepage and analysis views. GameAnalytics also provides Realtime specifically to help monitor activity as it happens and validate integrations.
Why the documentation connector is critical for you
The valuable part of this workflow is that Lovable is not guessing blindly. With the documentation connector in place, it can use the GameAnalytics docs as its implementation source.
In practice, that means it can:
- determine which SDK is the right fit for your project
- generate the initialization code
- instrument the relevant events
- wire the analytics setup into your existing app structure
In one recent test on a simple game-dev book tracking app, this process was extremely smooth: after the connector was added and the project was prompted to integrate GameAnalytics, Lovable asked only for the game key and secret key, implemented the setup, and events started flowing correctly afterward.
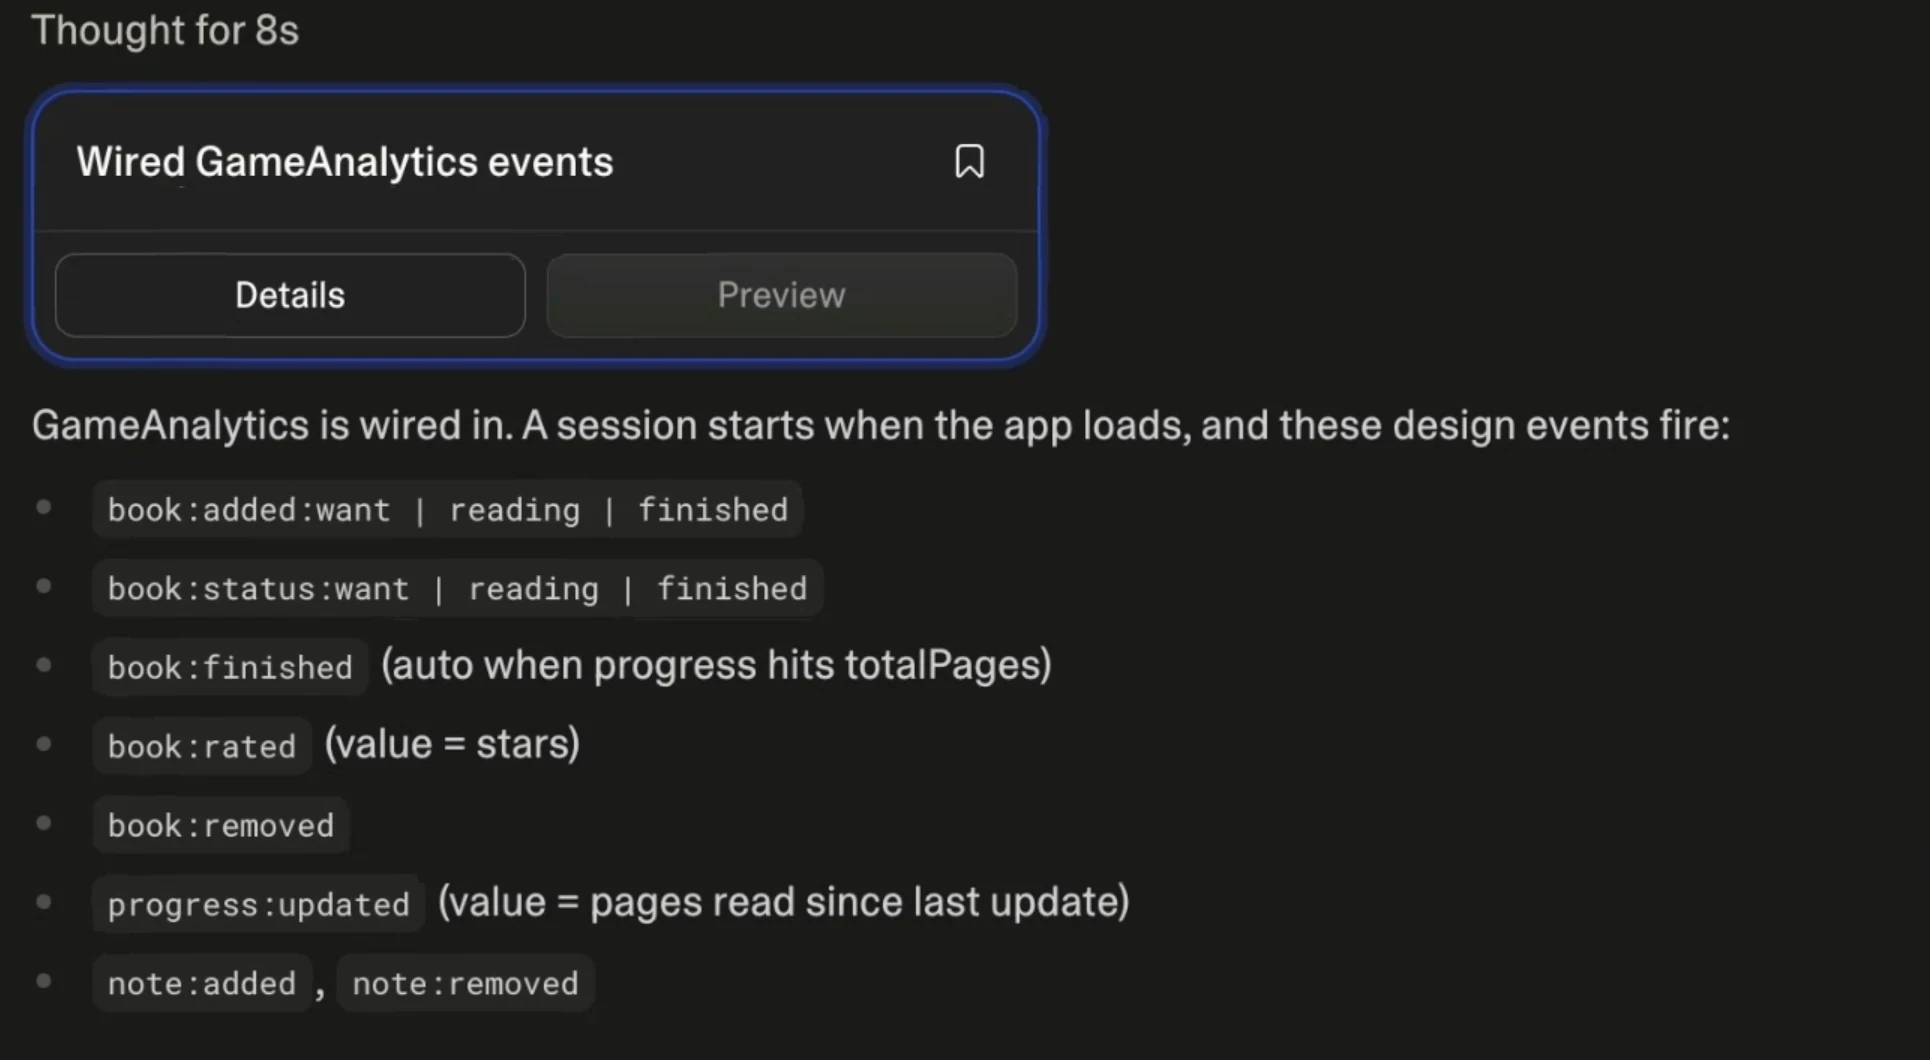
What kinds of events will it set up?
That depends on the project, but for lightweight web or app-style projects, you will often start with design events, which are GameAnalytics’ flexible custom gameplay or interaction events. These are typically the easiest way to track meaningful user actions in an early implementation. GameAnalytics documents design events as one of its core event types for tracking custom in-game actions and behaviors.
If your Lovable project becomes more game-like over time, you can expand from there into progression, business, resource, ad, or error events depending on the product. GameAnalytics supports all of those as standard event categories.
Why this is better than trying to force the Collection API
It is worth being explicit here: for Lovable projects, you should still think SDK first, not API first.
GameAnalytics explicitly says the Collection API is only suggested when you need a custom solution or do not have a supported SDK for your environment. In most Lovable scenarios, the better path is to let Lovable use the docs to determine the right SDK integration instead of falling back to a custom API implementation.
The 6-step integration path
If you want to add analytics to a Lovable project, the easiest approach is:
- create a custom chat connector in Lovable
- point it to https://mcp.docs.gameanalytics.com
- set authorization to none
- ask Lovable to integrate GameAnalytics
- paste in your game key and secret key
- wait for the first events to arrive
That is enough to get a working GameAnalytics integration into a Lovable-built project without manually stitching the setup together yourself.
FAQ
Can Lovable connect to GameAnalytics documentation through MCP?
Yes. Lovable supports custom MCP servers as chat connectors, which lets the agent read external documentation while building.
What URL should I use for the GameAnalytics documentation connector?
Use https://mcp.docs.gameanalytics.com as the custom connector URL.
Do I need authorization for this connector?
For this setup, no authorization is required in the Lovable connector flow.
What credentials does Lovable need to finish the integration?
Lovable will need your GameAnalytics game key and secret key, which you can get by creating a game in your GameAnalytics organization.
Will events appear immediately in GameAnalytics?
Not always instantly. The first events can take a little time to appear and for fields and dashboards to start populating. Realtime can help validate that activity is coming through.
Does Lovable use the Collection API for this?
GameAnalytics recommends using a supported SDK whenever possible, and only suggests the Collection API for custom or unsupported environments.